Grievous versus Tarkin Battle Report
Am I just destined to do battle with a Tarkin fleet whenever I field Grievous at Game Nite? Only the future can reveal the answer to that question. But to be fair, I was flying a different Grievous fleet this time, and against a different opponent than my previous batrep. My friend Chris said he wanted to fly his Clones because he's really only been flying Separatists, and he said that he wanted to fly against an opposing faction. That left me with Separatists, which I haven't flown much of (I think this was my fourth time flying them total? And that includes with a teaching fleet from Cabin Con 2021!), so I was looking forward to it. Plus, Chris is just generally a good guy and we hadn't gotten the chance to fly against one another in some time.
Since Grievous is clearly my Separatist commander of choice, I went with a Grievous fleet. While I had enjoyed the two times I had flown my Wolves Amongst Sheep fleet, I wanted to try something different. So I decided to fly a variation of my Dead Man's Party fleet.
Dead Man's Party/B (127/396/400)
===============================
Recusant-class Light Destroyer (85 + 26: 111)
· TI-99 (4)
· Ruthless Strategists (4)
· Reserve Hangar Deck (3)
· Ordnance Pods (3)
· Turbolaser Reroute Circuits (7)
· Gilded Aegis (5)
Comms Frigate (70 + 27: 97)
· General Grievous (20)
· Boosted Comms (4)
· Medical Team (1)
· Tide of Progress XII (2)
Transport (47 + 14: 61)
· Bomber Command Center (8)
· Beast of Burden (6)
DFS-311 (18)
DBS-404 (17)
Baktoid Prototypes (16)
4 x Hyena-class Droid Bomber Squadron (4 x 11)
4 x Vulture-class Droid Fighter Squadron (4 x 8)
Ion Storm
Fleet in Being
Infested Fields
The goal here is to sacrifice my Vultures, whether my opponent decides to kill them or not. If we fly Infested Fields, they can get chomped by Exogorths. If my opponent has squadrons, I can flak with Gilded Aegis, hit my Vultures with Ruthless Strategists, then flak again with Ordnance Pods, and hit my Vultures again with Ruthless Strategists. Basically, if the generic Vultures have even one damage on them, I can kill them myself to recover defense tokens. I'm going to spend those tokens liberally for TRC and Gilded Aegis on my Recusant, as well as never fear spending them with Beast of Burden to refresh tokens on other ships. So, there it is. And Chris? Well, he brought a Tarkin fleet that featured exactly zero squadrons.
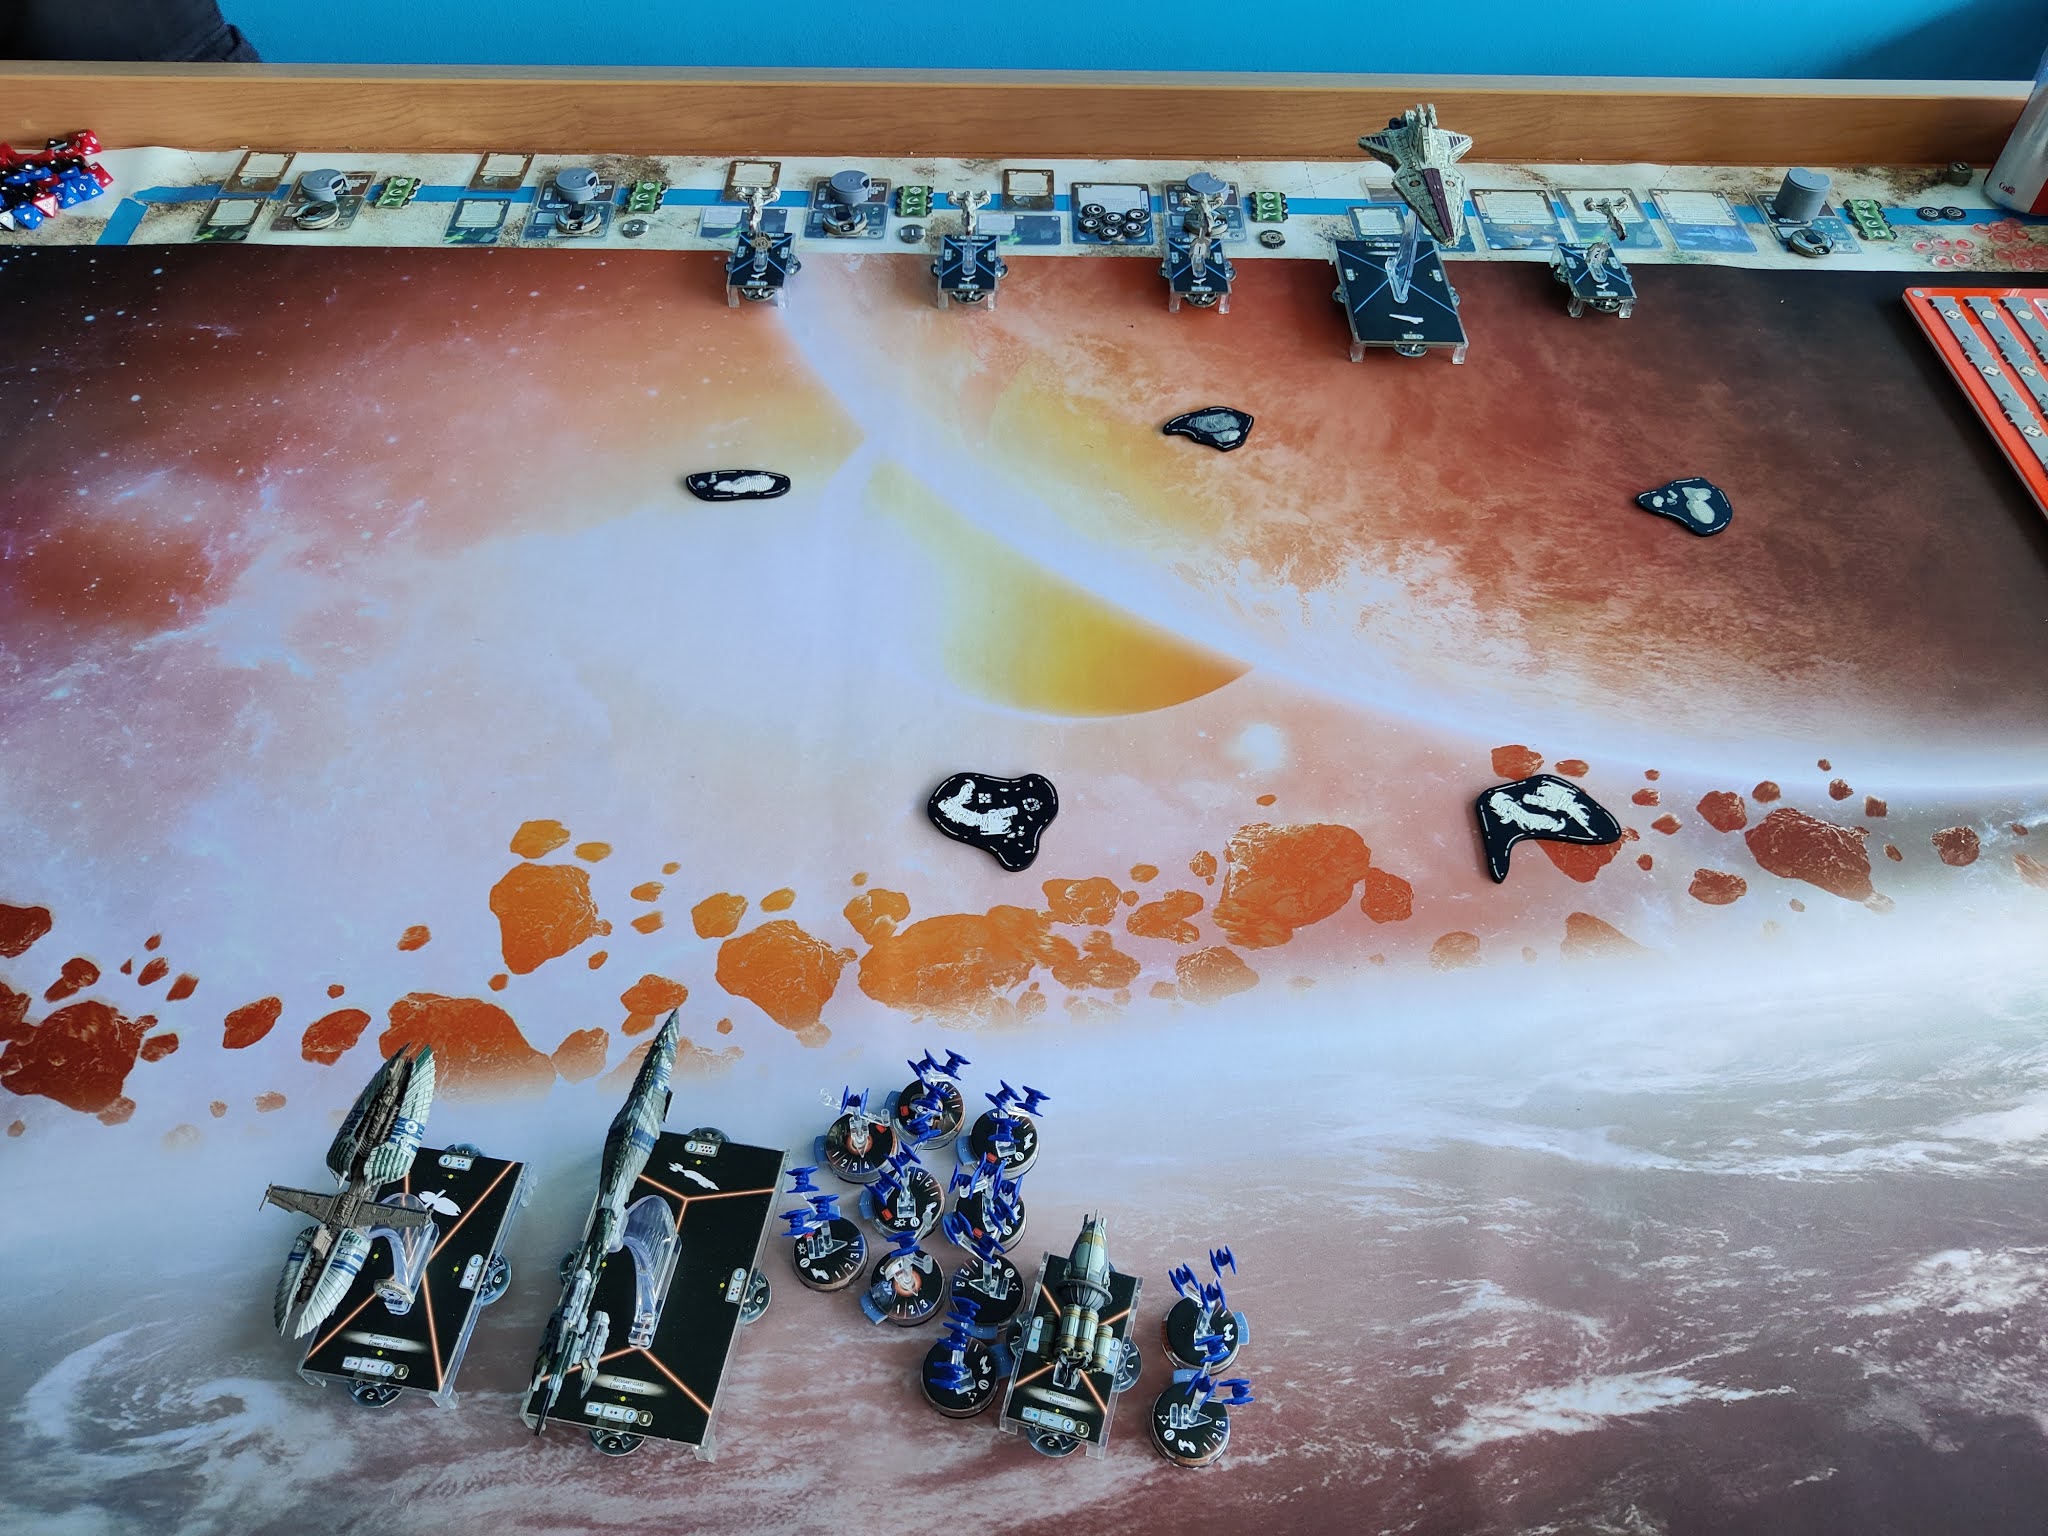
Deployment. Ruh-roh. That's a bunch of upgrades on the Recusant I won't be using at all.
Chris had the bid by...one point, I think? And he thought about first-lasting me, but chose to go second. I think that was absolutely the right call. I wanted to go second because I didn't much care about his alpha strike (in fact, I almost preferred it so that Grievous would be useful right away!), and because it meant I was only getting one pass token instead of two when faced with his Venator and his four Charger Consulars. I wanted nothing to do with his Superior Positions or Opening Salvo, so I went with Asteroid Tactics. It's true that he would get to place all the obstacles, but I wasn't terribly worried about that: I've got my own way of getting defense tokens back, and I thought it was likely he'd have to go out of his way to recover a defense token because his Chargers would be moving so fast. That was pretty much how it went, too; pretty sure he never recovered even one defense token because it was never convenient. I liked how things looked after deployment. I was absolutely not going to point-chase because I'd never catch those Chargers sporting Engine Techs. I'd take what he gave me. But my main objective was the Venator, because I knew I could get that and it couldn't get away. So I deployed closer to center so I could wheel as needed. But also, his Venator would have to basically run a post route (football; it's a thing) in order to threaten much more than my Beast of Burden, which meant I could dictate battle terms.

Top of Round 2.
This is where I made one of three mistakes that would cost me the match. If I make only two of the three, I win. Not easily, but I win. I'd never flown a Recusant or a Munificent before, but man, do I already really like them a lot. But whether or not Chris meant it as bait, I bit down. That Consular closest to center and closest to my squads ended up being a target my bombers didn't want to pass up. So my Hyenas swarmed it in the hopes that they could eliminate it before it did too much damage or ran away. Here's the thing, though: I know that my ships can't stand up to a prolonged beating, but the whole point of having Grievous and so many Vultures is ensuring that I can stick around at least one turn longer than I have any right to stick around, yeah? So maybe I should have trusted in that instead of trying to eliminate a threat too quickly. Because now, my Munificent (my carrier; the only ship with Boosted Comms) is out of range because my Hyenas outkicked their coverage. You'll see in the next picture that my Hyenas and Hyena aces are now firmly out of command range, which means they lose an entire turn of bombing. Stupid and sloppy on my part. It's funny - my Hyenas have free range with no enemy squadrons to fight, which is great! But it meant I was far less calculating than I needed to be. Also, I rarely fly a large squadron screen well. I do best with small and medium squadron screens. So it's a skill I need to learn, as evidenced by what I did in this match. Because now I've definitely got that Consular, which is great! But honestly, they were running Linked Turbolaser Towers and not TRC, so yes, the threat of damage was there. But there was no guarantee. And as you're about to see, it's not like I'd be able to save Beast of Burden from the oncoming Venator anyway.

Nearly the top of Round 3, but I activated Beast of Burden before I thought to take this picture.
Okay, so the second of the three mistakes I made can be seen in the differences between pictures of rounds 2 and 3: I got a little cheeky with my Recusant and didn't turn it as sharply as it needed to turn. It meant I sort of liked where my Recusant landed in a bubble. But Armada isn't played in a bubble; the wider turn by the Recusant meant that my Munificent also had to turn out wider, which means that those Hyenas remain out of commanding reach. It's a bad look. When I fly my tournament Tarkin list, I try my best not to waste the command tokens he hands out. In a very good game, I waste 0-1 tokens. In a good game, I waste 2. If I waste any more than that, I misplayed. I might still win the game and win it convincingly, but there were missed opportunities. Every round that my Hyenas do not bomb with the benefit of AI (especially against a squadronless fleet!) is a very, very big missed opportunity. Grievous will help me stick around longer than I should, but not forever. So my Munificent has to fly out wider than I wanted, and that's costly. Beast of Burden commits to its doom by activating first, knowing that if it doesn't, it likely won't get to activate at all. It throws some Hyenas with a squadron command, attacks the oncoming Venator, then gets right in its face to obstruct any SPHA-T shots the Venator would like to take at either the incoming Munificent or Recusant. I didn't want my source of bomber rerolls to go down quite so soon, but it was the right call given the circumstances. I know that Venator will wilt if I keep punching it, and it's the only ship in his fleet that cannot run. At this point, I make my third and final devastating mistake of the game: I use the navigate token on my Recusant to jump up to speed 3 and escape the Venator's front arc. I really, really didn't want him to hit me. But here's the thing: he had already blown his External Racks in order to get a clean kill on Beast of Burden without ramming it and getting stuck in place. My Recusant was completely clean - no shield or hull damage. I had options, and absolutely could have eaten one big Venator shot, no problem. But now I'm flying fast with no way to slow down (because I had not set dials that would let me slow down, as I had planned on using that token when I was ready to hit and run, because I anticipated Gilded Aegis taking at least some damage by this point). Also, I should note that the Munificent is doing a spectacular job of staying alive. Some of Chris' dice were cold, a decent number of my red dice were hot (even my Vultures twice landed a double hit against ships!), but the Muny kept ticking despite repeated attacks. And Grievous ensured it still had defense tokens even after burning them. So, good stuff. I did miss dice fixing on my Munificent, but honestly, had I played a better squadron game, it would have been irrelevant.

Top of turn 4.
At this point, you can see that another one of his Chargers is dead, as is Beast of Burden. At this point, I'm feeling pretty confident. Yes, my Munificent will die. But I think I'm going to get that Charger on the far left, which is carrying Tarkin. I'm also still fairly certain I'll get the Venator. But again, those three mistakes I made end up costing me because I made all three of them; had I only made two (any two!) of the three, I'd have gotten the Venator and at least one more Charger (possibly the one all the way on the right, maybe Tarkin himself), at which point, I win. I keep mentioning this not because I deserved to win. Let's be clear: Chris flew really well, despite flying what he called "an interesting list" (re: not optimized and not really that focused on winning, necessarily) with a faction he had barely flown at all. Chris has this gift for flying anything well, and I've learned not to underestimate him. Plus, I made mistakes and they cost me. Not my dice, but my errors in positioning. Which is exactly how this game should be! When I first started playing this game, I really lived or died by the dice because I had fundamental misunderstandings about the game. So the truth is, the result of this game was sort of what it should have been, if that makes sense?
The reason I keep bringing up how I *could* have won the game is because I'm trying hard in this debrief to focus on things I could easily have changed, and why I would have changed them. I know this version of Dead Man's Hand isn't optimized. I'm sure there are also people saying, "Why fly this when there are other more proven commodities out there you could have flown instead?" or possibly just simply, "You're not flying a good list." I might be hard-pressed to argue with any of that, but I'm not really interested in arguing it. In response to a fleet I posted last week, someone said that Bomber Command Center wasn't worth it because I only had three bombers. I won't argue that I know what I'm doing. But I will argue that making such an assertion as though it were fact is really narrow-minded, and limits what you'll be able to accomplish when building fleets and flying them. If I'm counting on my bombers to do damage in order for my list to be successful and I've got at least three bombers, then I've hit my threshold for whether or not I think BCC is a useful addition to the fleet. Especially if I didn't necessarily want to do anything else with those points or that slot. I'm identifying the mistakes I made because I'm confident that I lost this game due to user error rather than the weird fleet I'm flying. When I first started playing the game, that would really bug the hell out of me. Now, I actually find it reassuring. Because if the problem lies completely with the build, then there's nothing to do but change or overhaul the build because it doesn't work. But if the problem is user error, then I can just git gud, scrub, and that's imminently do-able.
Anyway, this is where it all goes off the rails. He barely kills my Munificent (which was sort of impressive, since I was confident he had it, no problem; the fact that it almost survived was really encouraging for future iterations of this fleet!) and turns tail. My Recusant still had a squadron token on it from a previous round when it wasn't worth commanding my Vultures and my Hyenas were out of range. Between my guns, TRC, and a little squadron bombing, I've got this. I've got this, right?

Top of round 5. I don't got this.
Speed 3 on the Recusant was just too fast. It does have a good navigational profile at speed 3, but I just couldn't turn hard enough without help and Chris' Venator was speeding along. Ultimately, he killed a couple of Vultures on the way out (before they could throw some desperate red dice) for a couple more points and everything else flew out of range. His Venator escaped with only one shield and two hull left. Even just one shot from my Recusant probably finishes the job. Tarkin escapes with two shields and one hull. Again, one bomber in the right place would've probably finished that job. And all of that was sort of with mistakes, right? Chris beat me soundly, 60-226. The score is a little misleading based on how the action went, but still, a convincing win for him in the end.
I had a great time playing this game, though, and while there weren't a lot of lead changes in the score, there were a lot of "apparent lead changes" based on positioning, dice, and what Chris and I both thought would end up happening. We all know that *almost* killing something in Armada is irrelevant (except for crippling an SSD). But knowing how this match unfolded, and knowing that the *almost* killing of his Venator and Tarkin's Charger was a thing that happened in spite of my mistakes means I think this Dead Man's Party thing is worth messing with. I've already changed the chassis over to a Recusant Support Destroyer for the additional Offensive Retrofit slot and additional squadron value. It's true that I lose Ordnance Pods because I lose the Ordnance slot. But at present, I'm happy to command an additional squadron with the Recusant, as well as make having Boosted Comms worth it on there. Ultimately, if I keep flying this fleet and get better with it, odds are I drop Boosted Comms. Why? Because I don't really want squadrons out at long range, lest they get beyond where TI-99 can help them. But we'll see what the future holds and whether or not I get to fly Dead Man's Party again any time soon!
Hey Chris, great game, and good write up! I agree that your fleet has potential. Those bombers are terrifying, and killing that Munificent felt like killing an MC80 with Krysta on it! Hope to meet you in the space-field of battle again, soon!
ReplyDeleteThanks, Chris! Always a pleasure to play against you, and I will happily accept your kind compliments, lol
Delete