Armada Tournament at Game Nite (October 2021)
This won't be your typical sort of tournament report because I'm not writing specifically about how I did (spoiler alert: not particularly well! Again!), but rather talking about the tournament and the fleets we saw as a whole. We had a casual Armada tournament at our Friendly Local Game Store (FLGS), Game Nite, this past Sunday. We had a total of 7 people show up (including myself). I considered sitting out so we had an even number and we'd simply run a 3 round tournament in which all 6 players played every round. several players in attendance thought they'd rather play 2 rounds and watch for a third, so I played, we had 7 players, and it was a 3 round tournament in which people got to take byes and catch a breather.
I'm basically going to tell you where each player placed, as well as what they were flying. Then I'll talk a little about my matches, but not go into too much detail. I say that because I don't approach local, casual tournaments the same way I approach sanctioned events, like Prime tournaments or Nationals. In looking at the fleet lists other people brought, I know I'm not the only one. People really came to play several Armada matches, test out new ideas, and test them in a tournament setting. For the record, I'm choosing not to share anyone's objectives but my own. I think a lot of people prefer not to share objectives simply because if they have a favorite (such as how one of my default choices when I field squadrons is Infested Fields), they'd prefer that not necessarily be public knowledge, and I can respect that.
First place went to Scott H. with 26 tournament points!
I hope they don't have evades! (19/394/400)
===========================================
Venator I-class Star Destroyer (90 + 53: 143)
· Admiral Tarkin (30)
· Intel Officer (7)
· Ordnance Experts (4)
· Assault Proton Torpedoes (4)
· Swivel-Mount Batteries (8)
Venator I-class Star Destroyer (90 + 29: 119)
· Intel Officer (7)
· Ordnance Experts (4)
· Intensify Firepower! (6)
· Assault Proton Torpedoes (4)
· Swivel-Mount Batteries (8)
Venator I-class Star Destroyer (90 + 23: 113)
· Intel Officer (7)
· Ordnance Experts (4)
· Assault Proton Torpedoes (4)
· Swivel-Mount Batteries (8)
Anakin Skywalker (19)
Second place went to John F. with 20 tournament points!
John F. (74/395/400)
====================
Onager-class Star Destroyer (110 + 32: 142)
· General Romodi (20)
· Hondo Ohnaka (2)
· Orbital Bombardment Particle Cannons (5)
· Cataclysm (5)
Cymoon 1 Refit (112 + 19: 131)
· Emperor Palpatine (3)
· Local Fire Control (4)
· Quad Battery Turrets (5)
· Linked Turbolaser Towers (7)
Raider I-class Corvette (44 + 4: 48)
· Impetuous (4)
Bossk (23)
IG-88B (21)
Ciena Ree (17)
Valen Rudor (13)
Third place went to Jon G. with 19 tournament points! Congrats to our top players for the day, Scott, John, and Jon!
No Chill (74/399/400)
=====================
MC75 Armored Cruiser (104 + 67: 171)
· General Madine (30)
· Flight Commander (3)
· Caitken and Shollan (6)
· Rapid Launch Bays (6)
· Electronic Countermeasures (7)
· Point Defense Ion Cannons (4)
· External Racks (4)
· Linked Turbolaser Towers (7)
MC80 Battle Cruiser (103 + 25: 128)
· Gunnery Team (7)
· Linked Turbolaser Towers (7)
· Dual Turbolaser Turrets (5)
· Mon Karren (6)
GR-75 Medium Transports (18 + 8: 26)
· Bomber Command Center (8)
Keyan Farlander (20)
2 x B-wing Squadron (2 x 14)
2 x X-wing Squadron (2 x 13)
Fourth place went to Chris N. with 16 tournament points.
Ballistic Thrawn (0/395/400)
=============================
Kuat Refit (112 + 51: 163)
· Grand Admiral Thrawn (32)
· Ordnance Experts (4)
· Electronic Countermeasures (7)
· Point Defense Ion Cannons (4)
· Assault Proton Torpedoes (4)
Gladiator I-class Star Destroyer (56 + 8: 64)
· Ordnance Experts (4)
· Assault Proton Torpedoes (4)
Gladiator I-class Star Destroyer (56 + 8: 64)
· Ordnance Experts (4)
· Assault Proton Torpedoes (4)
Raider I-class Corvette (44 + 8: 52)
· Ordnance Experts (4)
· External Racks (4)
Raider I-class Corvette (44 + 8: 52)
· Ordnance Experts (4)
· External Racks (4)
Fifth place went to Rob with 15 tournament points.
Mines, Mines, Mines (81/396/400)
================================
Victory I-class Star Destroyer (73 + 52: 125)
· Admiral Motti (24)
· Local Fire Control (4)
· Proximity Mines (4)
· Wide-Area Barrage (2)
· Enhanced Armament (10)
· Warlord (8)
Victory I-class Star Destroyer (73 + 22: 95)
· Weapons Battery Techs (5)
· Proximity Mines (4)
· External Racks (4)
· Spinal Armament (9)
Victory I-class Star Destroyer (73 + 22: 95)
· Weapons Battery Techs (5)
· Proximity Mines (4)
· External Racks (4)
· Spinal Armament (9)
Hondo Ohnaka (24)
Maarek Stele (21)
4 x Tie Bomber Squadron (4 x 9)
Sixth place went to Mike W. with 11 tournament points.
Mike W. (125/397/400)
====================
Comms Frigate (70 + 44: 114)
· Kraken (30)
· TI-99 (4)
· Hyperwave Signal Boost (3)
· Linked Turbolaser Towers (7)
Recusant-class Support Destroyer (90 + 19: 109)
· T-series Tactical Droid (4)
· Flight Controllers (6)
· Flak Guns (3)
· XI7 Turbolasers (6)
Transport (47 + 2: 49)
· Comms Net (2)
General Grievous (22)
Tri-Fighter Squadron (11)
4 x Hyena-class Droid Bomber Squadron (4 x 11)
6 x Vulture-class Droid Fighter Squadron (6 x 8)
And I brought up the rear of the pack to take seventh place with 9 tournament points!
Jedi Mind Tricks (78/399/400)
=============================
Venator I-class Star Destroyer (90 + 69: 159)
· Obi-Wan Kenobi (28)
· Barriss Offee (6)
· Ordnance Experts (4)
· Intensify Firepower! (6)
· Flak Guns (3)
· Expanded Launchers (13)
· XI7 Turbolasers (6)
· Tranquility (3)
Acclamator II-class (71 + 28: 99)
· Expert Shield Tech (5)
· Clone Gunners (4)
· Electronic Countermeasures (7)
· Linked Turbolaser Towers (7)
· Nevoota Bee (5)
Pelta-class Transport Frigate (45 + 18: 63)
· Expert Shield Tech (5)
· Munitions Resupply (3)
· Projection Experts (6)
· FB-88 (4)
Plo Koon (24)
2 x V-19 Torrent Squadron (2 x 12)
3 x BTL-B Y-wing Squadron (3 x 10)
Advanced Gunnery
Fleet in Being
Solar Corona
I shared a similar build on my blog earlier, but never got a chance to fly it. The one thing I was very attached to was using Barriss as a soft counter to Accuracy blocking my ability to use Obi-Wan. I wanted to see if it was worth the effort more than anything else in this list. The short answer is yes, it's worth pursuing. Especially with Tranquility. However, without being able to leverage Brace, it's a lot of damage to eat against a big hit. But I'll get to that.
I was matched up against John F in the first round and felt pretty good about the matchup knowing he'd want to keep his distance, given that he was flying a Cymoon and an Onager. You can see from our deployment below that I plan on taking his flank.

I'm anticipating that he'll line up his Onager behind his Cymoon for some cover, as it not only protects the Onager, but also triggers Romodi's ability. I don't really want to eat his Superweapon shots, but I also think I can weather the storm between Obi-Wan and the other defensive tech I've got in place. Jon had the bid and chose to go first. He chose to play my Advanced Gunnery, and I was pretty relieved. No, I don't want his Cymoon hammering me, but my two big guns have really sizeable front arcs and want to keep those arcs pointed at the enemy. Sure, now his Cymoon can hit both my Acclamator and my Venator from its front arc. But my Venator can fire twice from the same arc at the same target. I'll take the trade-off and be cautiously optimistic. If you're wondering what my Pelta is doing out there in the middle of the board flying straight into the Kill Box, the Pelta was my first deployment, was meant to be a flexible one, and allowed me to deploy my squadrons before having to commit the rest of my fleet. I have every intention of turning my Pelta away from that fight so it can fall into line with the Acclamator and charging Venator.

Not much to observe here except it's clear I'll get shots on the Raider first and will need to eliminate it before it gets behind me.
Turn 3 is when things get a little interesting, as you can see above. The Onager fell in line behind the Cymoon as I anticipated. And the Raider turned in a bit, which meant I was confident it would stick around too long and I could snipe it. The squadron skirmish went a little oddly, but wasn't anything I worried about. Bossk was lurking around the Venator, but I decided to take the risk of letting him run wild while my V-19s addressed other squadrons to free up my Y-Wings. You can see my Acclamator approaching the inside of the Cymoon while the Venator runs outside. As my Acclamator is the one pushing my squadrons, that was part of my decision to keep it close. But crucially, I needed the Venator to take care of itself so that my Pelta could use Projection Experts in order to preserve my Acclamator for as long as possible.

You can see that I wiped out the Raider pretty easily, courtesy of Nevoota Bee. My Venator managed to get out of the front arc of the Onager, but couldn't *quite* sneak by the Cymoon's front arc. So at this point, all hell broke loose, though John came out better on the other side of this encounter, having traded his Cymoon up for my Venator and my Pelta.

Can't you just feel that tension?!

It came down to the wire, but ultimately, my Acclamator just couldn't stand up to the Onager's Ignition shot. One Accuracy is fine, but John rolled multiple Accuracies and I just couldn't withstand that much additional damage without support from Obi-Wan or my other ships. The final score ended up being 490-329, which was enough for John to bank 8 tournament points to my 3.
So, what happened? Well, first of all, the Republic fleets I build tend to live or die by their dials. I think that's true of most Republic fleets, honestly. Their biggest capital ship batteries aren't as big as the other three factions (mostly owing to the fact that they have a difficult time double-arcing because of their terrible nav charts, so their single arcs have less firepower than ISDs, and Separatists and Rebels have an easier time double-arcing things, for the most part), so a well-timed Concentrate Fire dial is sometimes the difference between doing work and lining up for the slaughter after a pillow punch. The nav charts on both the Acclamator and the Venator are both tough to work around without some help, so a mistimed Navigation dial (or, more accurately, a dial with any of the other 3 commands timed poorly) can absolutely kill a ship. Or even if it doesn't kill the ship, it may kill any chance it had at being effective. Much like how a player cannot win a game upon deployment but can absolutely lose a game upon deployment, big Republic ships may not win a fight based on where they land, but they can absolutely lose one. Owing to the fact that neither the Venator nor the Acclamator have duplicate defense tokens, Engineering is vital to keep them humming long enough to impact the battle. And because the faction as a whole really relies pretty heavily on its squadrons, the power of a Squadron dial cannot be overstated.
I mention all of this because, in my opinion, my dials really had to be spot-on in order for my strategy to work, and they simply weren't. I think the strategy overall was a sound one! But my dials were just off enough that I wasn't Engineering when I needed to in order to stay alive. I navigated just a hair too frequently, which meant that I ended up effectively wasting said dials. And I had one window in which FB-88 was supposed to throw some shields over to the Tranquility, but I forgot. Is that the difference between the Venator living and dying? I don't know. I didn't math it out because I felt bad enough about missing my window. But those are the kinds of choices borne of wisdom that comes from flying a fleet more than the zero times I'd flown it prior to this match. To John's credit, he flew well, his squadron contingent was solid, and his target prioritization meant I didn't really have any slack with which to make mistakes. The result was that he tabled me but good. Honestly, I was happy to get the Cymoon, because there was a moment in which I was questioning whether or not I would. Good match, John! He'd go on to win 2nd in the tournament, and I was glad to see him place well!
Next up, I was matched up against Jon G. and his Madine-led fleet! I was looking forward to this matchup, because I really thought I had the edge. I felt good about being able to control the squadron game, especially since Keyan and the 2 B-Wings were loaded onto the MC-75 via Rapid Launch Bays. I figured I'd get to kill one of his ships and only go for the second if the stars aligned and the third base coach was waving me home (like those mixed metaphors? Good stuff...). I had the bid and decided that I wanted to go first, so out of Jon's three objectives, I selected Fleet in Being. It's a big advantage for his two Command 3 ships, but I have an opportunity to refresh my Redirect token so I can use Obi-Wan multiple times on the same ship in the same turn? Sure, I'm game for that!

I had Jon outdeployed pretty badly, mainly because of his use of Rapid Launch Bays. So I decided to take the LMC-80 down. If there was still time and opportunity, I'd then throw my Y-Wings at his MC-75 and see if I landed enough damage to turn out and try to finish it.

This right here is where it went kinda pear-shaped. Can you see the problem?
My Acclamator is going to land right between my Venator and his LMC-80. Yes, I activate first, but he's got me out-activated as long as our ship counts are even. Which means my Venator will move into position to fire on the LMC-80, but its guns will be pointed at where the LMC-80 is instead of where it will be. Rookie mistake.

And you can see that Jon reacted appropriately, speeding on by after taking his shots instead of sticking around and hoping my dice were cold and that he'd win a footrace to a kill. Worse than that, as you'll see the battle progressively unfold, my Venator is now going to have absolutely NO impact on the battle. It can't even turn around fast enough to try and get back into it.

At this point, both my Acclamator and Venator have survived, but are completely out of the fight. By the top of round 4. Atrocious. Jon has me on points because his squadrons have been all too happy to murder my V-19s. Once that has happened, he's got me on points. That'll become doubly true later when my big ships wander into his deployment zone and accidentally sacrifice their Fleet in Being tokens *facepalm*. So I can either cut my losses and run, or I can swing big and hope I connect.

I decide to swing. My Y-Wings can't do much while they chase the LMC-80, but they can herd it to the edge of the board. Sure, I'd rather drop bombs on it, but 2 of my 3 Y-Wings had already completely whiffed earlier on multiple attacks, despite Nevoota Bee rerolls. So Imma have to win through positioning because I can't count on fairly reliable dice. The LMC-80 is definitely walking wounded, and my Pelta managed to scrape by courtesy of the FB-88 title allowing me to dial up Engineering and thanks to Obi-Wan's ability and Expert Shield Tech. That's some seriously dark magic when I'm allowed to wield it. The Pelta hit up the station for some repairs (it only had 1 hull point left as it limped away from its encounter with the LMC-80 and MC-75), used its Engineering dials, and proceeded to chase the LMC-80 with its red dice. Jon either had to run his LMC-80 off the board, or risk eating the Pelta's red dice (or slowing down and eating black dice from the pursuant Y-Wings). Ultimately, he chose to turn in and risk the Pelta's red dice. And...

...the Pelta scored the hits it needed to kill off the LMC-80. It landed right in front of the charging MC-75 and died immediately thereafter. But I needed to kill the LMC-80 to secure the win and I did it. But between the squadrons Jon killed and the points he got from the objective, it was only a 155-141 win for me. It came down to a 14 point Margin of Victory, so I won 6 tournament points.
After the match, we talked a little, and Jon determined he needed to be more aggressive with his MC-75. I couldn't agree more, and I told him as much. But he won the squadron battle, and that was really important. He snuck by my big ships, and that was huge. At the end of the second round, I ended up sitting out the third round so everyone else would have the chance to play in the final round. I can always play a third game, but I was happy to watch, judge, set up the prize table, and just enjoy being in the company of some good folks. So I ended the tournament with 9 points.
Ultimately, I like the idea behind my fleet, but despite my own mistakes in flying it, I identified some weaknesses that I just didn't think would get any better, even if my play improved. So I decided to reshape it and see if I couldn't turn it into something that might stand a better chance. My inclination was to build around Electronic Countermeasures so that I am guaranteed to use my Redirects or Braces when I need them. But that's ALWAYS my inclination with Obi-Wan Kenobi as a commander, and that's because it's an easy solution to the problem he'll always face. It's an easy solution, but it's an expensive one. So after much consternation, I decided to go in a different direction. I'll be sharing the results of those changes on Thursday, so I hope you'll visit again on Thursday to see what nonsense concoction this tournament inspired!
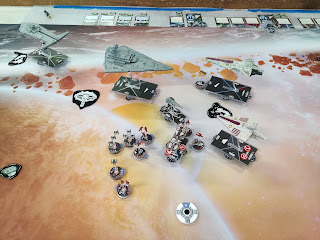
Below are some shots of other tables that were happening in the tournament. Hope you enjoyed this tourney recap, and I'm hoping to be more consistent with sharing these in the future!

Tarkin versus Kraken!
 Thrawn versus Madine!
Kraken versus Madine!

Thrawn versus Tarkin at the top table in round 3!
Comments
Post a Comment